9.26.2010

Autumn Plums

Summer is unfortunately over.  It's a fact.  It has only been over for 4 days, but to me, it ended the day I came back from vacation about two weeks ago.  As much as I love the cooler fall days, it's always hard to say goodbye to warm nights- the perfect excuse to go out for drinks and sit outside, farmers markets FULL of fruits and vegetables, and my favorite "it's a Friday in August so I'm leaving work early" excuse.  Fall means back to school, back to work and the start of the root vegetable season at the farmers' market.  Before all brightly colored fruits hibernate for the winter, fall gives us a few last bursts of color, like the pomegranate, the plum and figs (OK I know some figs are black but there are some pretty lime green ones too!)

I've discovered a new interest in cocktails.  I never really enjoyed sweet cocktails like the Cosmopolitan but I thought those sugary/sour/fruity drinks were my only option if I wanted something other than a beer or a glass of wine while sitting at a bar.  This isn't the first time that it turns out that's I'm wrong..  Over the summer I found several bars, in DC and other cities, that are "re-creating" the cocktail, using creative new combinations of flavors and ingredients.  Fruits, herbs, bitters, infusions- the possibilities are endless.  I've made Limoncello before and I just infused vodka with lemon verbena but those both have vodka.  I wanted to try a new liquor.  To go along with my "fall" mood, I thought I would try a recipe for plum brandy my sister found for me in the New York Times. She sent me two recipes: "Brandied Plums with Cinnamon and Vanilla" and "Pomegranate Gin Preserve". Brandied plums it is! The pomegranates will have to wait.

IMG_0396.JPG

Brandied Plums with Cinnamon and Vanilla

Adapted from The New York Times - published on September 21, 2010

Ingredients:

IMG_0400.JPG

2 lb of plums

1/2 cup sugar

1 liter of brandy

one cinnamon stick

1 vanilla bean, halved lengthwise


Directions:

This really could not be easier.  I changed the original proportions a little but nothing really changed all that much.  The recipe is put together in under 10 minutes and then you just have to wait.

Wash the plums and prick them all over with the tip of a sharp knife.  Put them in a large jar (the kind with a top that clamps shut).  I used  3 liter jar and it was not full.

IMG_0404.jpg

Pour the sugar over the plums and then add the brandy.  Plop in the cinnamon stick and the vanilla bean and voila!


IMG_0406.JPG

Let the jar sit in a cool dark place (not the fridge) for at least 6 weeks, and up to 3-4 months.  Gently "shake" the jar from time to time, by turning the jar over.  Who knows.  This is an experiment.  The ingredients sound like they would go together and it if works, I'll have a delicious drink to sip when it's cold this winter (or give away as Christmas gifts because let's be honest, that's a lot of brandy).  I'll keep you updated on the brandy's status!

IMG_0407.JPG


***

I had some plums leftover so I thought I would make a cake.  Last week I made a delicious peach upside down cake with the last of my summer peaches.  I've learned that most stone fruit desserts work with just about any type of stone fruit (or any sort of fruit in general really because a tart tatin is the apple version of this cake.)

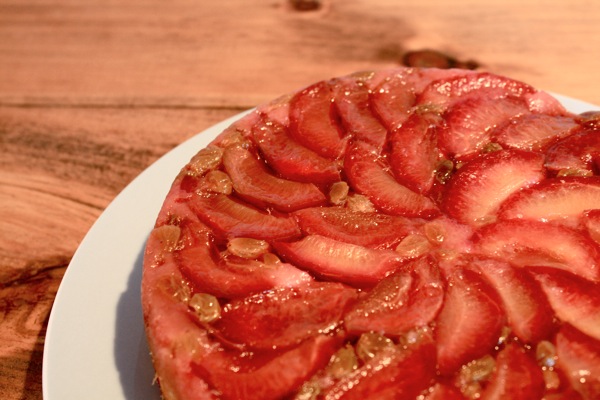
Plum and Rum Raisin Upside Down Cake

Adapted from the Honey Peach Upside Down Cake from Hotpolkadot

Ingredients:

About 8-10 plums depending on the kind you use and how big they are- quartered

1/4 cup of maple syrup

1/4 cup of golden raisins soaked in about 1/4 cup of rum - drained.

1 cup of flour

1 tsp baking powder

1/2 tsp salt

1/2 cup unsalted butter - room temperature

1/2 cup sugar

1/2 cup honey

2 eggs


Directions:

Preheat your oven to 350.  Butter a 9 inch round cake pan (sides and bottom).  Cup out a round piece of parchment paper and put it on the buttered bottom of the pan.  Butter the parchment round.  (I know it sounds like a lot of butter but this is an upside down cake.  You really don't want it to stick when it comes time to flip).

Pour the maple syrup on top of the buttered parchment paper.  The original recipe called for honey but I thought the deeper flavor of maple syrup would taste really nice with plums.  Take your plum quarters and arrange them, cut side down, in a nice circular pattern.  Take your rum raisin and sprinkle them evenly over the plums.  Set this aside and now.  It's time to work on the cake batter.

IMG_0427.JPG

IMG_0429.JPG

In a small bowl, mix together your dry ingredients (flour, salt and baking powder).

In your mixer's bowl, cream the butter and sugar together.  Add the honey and then the eggs.  I added a little nutmeg because I think nutmeg tastes like fall.  You can omit it, of course, or add your spice of choice.

Slowly add the dry ingredients to the wet ingredients and you're done!  The batter will not soupy.  In fact, you probably won't be able to pour it out of the bowl.  Use a spatula to scoup and plop it into the pan (kind of like mashed potatoes).  Don't be afraid to use your fingers to gently convince the batter to fill in the little holes between the plums.  Work the batter into the pan and put it in the middle of the oven.

The recipe calls for baking the cake for 30-35 minutes.  Both times I made this it took me more like 40-43.  See what works for you.

When the cake is done (clean toothpick test), let it cool until you can pick up the pan with your fingers without burning them (idiot test).  Put a large plate over the pan and quickly flip it and put the plate down on the table.  If all the buttering did its job the cake should easily slip out of the pan.  If the parchment paper came out of the pan with the cake, just carefully peel it off.

Serve it warm or refrigerate it for the next day.
IMG_0436.JPG

IMG_0435.jpg

Happy fall.


8.16.2010

A cool summer drink and a weekend in NY

IMG_4167Three years after making Limoncello as Christmas gifts I have decided to give infused liquors another try.  The family lemon verbena plants are growing out of control this summer and I was trying to figure out what I could make with the sweet and lemony smelling leaves.  If vodka infused with lemons makes a good drink vodka infused with lemon verbena should too right?  Only one way to find out!IMG_4135 After consulting with my friend at the restaurant about proportions, I set off last week to buy some vodka! The guy at the store was skeptical when I brought several liters of vodka to the counter but he wished me luck and I was on my way to making lemon verbena vodka! 

Lemon Verbena Vodka

Ingredients:

4 cups of lemon verbena leaves (taken off their stems and washed)

2 liters of good vodka (I used grey goose but I’m sure anything not in a plastic handle would do just fine!)

Directions:

Put the lemon verbena leaves in a 2-3 liter jar.  IMG_4139 Pour in vodka and stir!  Complicated right?  IMG_4141 Let “steep” for as long as you want.  I thought it would take a lot longer for the verbena leaves to infuse the vodka but after two days the vodka smelled like lemon and looked as green as grass -nothing like the limoncello I made that needed to sit for at least a month to fully infuse. I’m sure I could have let it steep for a few more days but the leaves were starting to turn light yellow which to me meant their had given all they could. IMG_4143  Time to take the leaves out!IMG_4166 I mixed the infusion with soda water and ice and it made the perfect summer drink.  Cool and refreshing and satisfyingly home made.

*** 

I took a last minute trip this past weekend and escaped to Brooklyn for a great weekend of family, food and cocktails!  We had a fantastic dinner at James and fun cocktails at the Clover Club.  I don’t have any recipe posts but I have a little photographic tour of the details I saw around Brooklyn instead.

Brooklyn Botanical GardensIMG_4153 IMG_4148 A little friend hanging out in the herb garden at the BBG IMG_4149 IMG_4150 IMG_4151 IMG_4152 IMG_4157 IMG_4155 IMG_4156 My aunt’s kitchenIMG_4161 IMG_4160

IMG_4165 IMG_4163 IMG_4164

8.01.2010

A Peachy Summer Weekend

IMG_4077 Growing up, summer days meant going to camp.  We would bring our own brown bag lunches and toss them in a big rubber bin along with all the other lunches, hoping the bag on top of yours wouldn’t leak and rip your lunch bag.  I can still picture all of us sitting outside on the designated “lunch hill” eating our sandwiches and drinking the box of “fruit punch” provided by the camp.  While other kids ate their Twinkies and cupcakes, I usually sank my teeth into a sweet juicy summer peach.  I distinctly remember always having sticky fingers after lunch. Juice would dribble from the peach down my chin and onto my hands.   Ah, summer.

While I no longer have the luxury of going to summer camp, thankfully peaches are still part of my summer!  My eyes tend to be bigger than the number of recipes I have when I am at the farmers’ market.  I bought a LOT of peaches.  Thankfully they keep pretty well if you put them in the refrigerator.  I put some away and kept a few out and went on a peach recipe hunt.  After looking at recipes for cobblers, tarts, pies, and a cakes I figured peach ice cream would be the best way to honor the summer staple.

Ice cream recipes, as I learned when I made my favorite, mint chocolate chip, are VERY simple.  Häagen-Dazs isn’t kidding with it’s new ad campaign highlight how pure and simple the product it.  It’s not just Häagen-Dazs but all ice cream really.  All the recipes I looked at had the same cream/milk/egg combination.  The only thing that really changed was the sweet component.  I decided to go with honey.

In the spirit of intellectual honesty, I read the following blogs as inspiration and basic ratios. www.eatatblurp.com, www.peterandrewryan.com, www.dessertfirst.typepad.com.

IMG_4125

Summer Peach Ice Cream

Ingredients:

4 large ripe peaches for the puree and 1 for to put in the ice cream later

1/8 of a cup of honey (the recipes I read called for a 1/4 cup.  I thought this would make the ice cream too sweet.  Depending on the ripeness of the peaches you can decide for yourself.  I went for less.  I also don’t like my desserts to be too too sweet.  I get honey from a family friend and try and use my local honey as much as I can!)

1 cup of whole milk

1 cup of heavy cream

3 large egg yolks

1/2 cup sugar

2 tsp vanilla (I used the 2 tsps and I also split a vanilla bean in half, used the seeds and simmered the bean in the milk/cream pan for added flavor. )

Directions:

Peach Puree:  Peel and cut up the 4 peaches and simmer them in a saucepan with the honey until the peaches become very soft and are cooked throIMG_4082ugh (about 15 minutes).  Let the mixture cool a bit and then puree it in a food processor until it looks smooth.  Easy! (Note: you could probably do this with just about any fruit.  You could make a berry puree, a plum puree…. experiment!)

IMG_4083 

Custard for the ice cream: Pour milk and cream into a saucepan and bring to a boil.  Meanwhile, separate your eggs and mix the sugar with the egg yolks with a whisk until they are a light yellow color.  When the milk and cream are nice and hot, take about a 1/4 cup and pour it slowly into the yolks, whisking all the while, to temper the eggs.  Make sure not to curdle them!  Now that the eggs have warmed up a bit, slowly pour the rest of the milk mixture into the eggs in a slow trickle. 

Split your vanilla beans and scrape the seeds out.  Instead of throwing away the vanilla pod you can either put it in a sugar canister and make vanilla sugar, or do what I did and just add it to the custard to give it even more vanilla flavor.  I had been saving my vanilla beans for something special.  My brother in law got them for me during a trip to Madagascar.  Peach ice cream sounds special enough to me!

Pour the egg, milk and peach puree and cream mixture back into your saucepan and stir on medium heat until it thickens into a nice custard that covers your spoon. Add the vanilla extract, vanilla seeds and plop in the vanilla pod to infuse the mixture.

Refrigerate the custard for a few hours or over night to completely chill it.

The next day: (Don’t you hate it when you start making a recipe without reading the whole way though and you get to the part that says “the next day” and kick yourself?…. It happens to me… a lot.)

Take the chilled custard out of the refrigerator.  Dice the remaining peach into small cubes.  Pour the custard into the ice cream maker.  When it is about the consistency of frozen yogurt, add the peaches. 

Put it back in the freezer for a few hours for the whole thing to firm up and enjoy!

This ice cream has such an intense peach flavor.  I couldn’t have been more pleased with it.  Delicious.IMG_4123

IMG_4126

7.04.2010

A sweet 4th of July

flag cake blog The 4th of July isn’t necessarily a holiday surrounded by a lot of culinary traditions.  Thanksgiving, Christmas and Easter all have their culinary musts: turkey, goose, lamb, pumpkin pie, Christmas cookies, eggs.  The 4th of July has barbeques I suppose, but no real “must haves”…except for a long standing tradition in my family: the flag cake.  I’m not sure when we started baking the Flag Cake or how the idea came about but it’s just not the 4th of July without it for me. 

I am proud to be an American but my patriotic flair is limited.  You will not find me wearing a flag pin, or with a flag sticker on my car.  I don’t usually sing the national anthem at ball games (I’ll stand up for it though!!), I won’t get into heated discussions about patriotism and usually try and avoid dressing in red white and blue.  My patriotism for the year comes out on the 4th of July.  I wear a flag in my ponytail, go down and watch the fireworks on the National Mall and will not miss making my Flag Cake. 

This year I was getting worried that I would not have an excuse(other than the obvious holiday reason) to make my flag cake.  I didn’t want to have to eat an entire cake by myself… thankfully my friend Beth threw a barbeque and saved me from a sugar overdose.  Perfect excuse to bring out the sugar and food coloring and pretend I am a kid again.

Chocolate cake and white icing is pretty typical, but this usual, everyday sort of cake, is transformed when it meets blue and red colored sugar.  It goes from a boxed cake to, in mIMG_4049y opinion, the highest level of patriotism!  Several versions have been tested:  red and blue icing on icing white, blueberries and sliced strawberries on white icing (the fruit ended up releasing juice on the white frosting so that didn’t work.. our colors don’t run!.. I had to say it.. sorry).  The traditional, tried and true method of coloring sugar with food coloring still seems to work the best.  

I usually bake from scratch but the point of this cake is not to spend hours sifting flour and measuring cocoa powder.  It’s to play and decorate.  We have always used a boxed cake mix and there is no shame in that.  The traditional Flag Cake frosting is made with butter, confectioner’s sugar and milk.  While it’s delicious, it’s a little too sweet for my taste.  I asked the pastry chef at the restaurant I work at to give me some frosting tips.  Working at an Italian restaurant she suggested Mascarpone!  Easy, not necessarily healthier, but a little less sweet. 

4th of July Flag Cake

1 box of chocolate cake mix (it’s ok I promise)

white sugar – divide the sugar in two bowls and add red food coloring to one bowl and blue to the other and mix it until the colors is as deep as you want it.

Mascarpone icing:

(2) 4oz tubs of mascarpone cheese

heavy cream – Use as much as you like.  I got a little box and poured some into the mascarpone until I thought it was the right spreading consistency

confectioner’s sugar – I ended up using a little less than a 1/4 cup.  It all depends on how sweet you want your frosting.  The most sugar you put in the more cream you will need because the sugar really makes the mascarpone stiffen up.

Directions:

Put both tubs of mascarpone cheese into your mixer.  Mix on medium speed for a few minutes just to have it be creamy.  Add a little bit of heavy cream (about 2 tbs) and see how smooth it gets.  Add some confectioner’s sugar to taste.  Beat it on medium high for about a minute just to incorporate everything well.  I added a little rum at the end, about a tablespoon, just for extra flavor but it’s not necessary if you want to keep the cake PG.

There! You’re done! It’s time to ice!

IMG_4048 Spread the icing over the cake and you are ready to decorate!IMG_4053 IMG_4055 I cut out stripes of parchment paper to cover the parts the cake I wanted to keep “white”.  I first thought I was going to make the flag with the correct number of stripes but then decided against that.  It’s been done in the past but I decided to go “modern” this time.

Decorate and enjoy!!IMG_4056

IMG_4057 

* * *

Apparently making  a flag cake wasn’t enough for me this year.  I was reading tastespotting the other day and saw a post for cute little patriotic strawberries and just had to make them. They are so easy and the cuteness factor is pretty much off the charts.  IMG_4065

4th of July Chocolate Covered Strawberries

What you will need:

Strawberries – washed and dried off

White chocolate chips

Blue sugar

Directions:

Put the white chocolate chips into a bowl and heat them up in the microwave at 10 second intervals, stirring each time they come out.  It took me about 40 seconds to have melted chocolate.  I first tried to do it over the stove and the chocolate seized up right away.  I then tried to put it in the microwave.. it worked.  I added a little rum to it and it seized up again.  On my third try I just tried the microwave and no rum this time (put the booze down!) and it worked.  I’ve worked with dark chocolate and have been pretty successful with it but white chocolate is clearly a whole different beast.  So… long story short, melt the white chocolate chips and don’t add anything fancy to it and it will work just fine.

Dip the clean, dry strawberries about 3/4 of the way into the chocolate and then dip the tip in to blue sugar.  Done! Cute little patriotic strawberries.  Put them in the refrigerator to harder up and share them with friends. 

Happy 4th of July everyone!

IMG_4064 A special “shout out” to my mother and father who are spending the 4th in France and my sister and brother in law who are spending it in South Africa.  A little bit of USA while you are traveling!


6.19.2010

Mushroom and Leek Quiche

IMG_4001 I’m trying to expand my “quick dinner” repertoire.  This doesn’t have to mean quick to fix (even though it is in this case) but something that can either be easily re-heated or eaten cold/at room temperature.  I grew up loving quiche. Quiche Lorraine, spinach quiche, leek quiche, mushroom quiche, broccoli quiche… I love them all. They are a great way to eat your vegetables!  Quiche is not only very simple to make but no matter what you put in it you get a healthy meal that you can eat for lunch, or dinner (or cold breakfast as was the case this morning).   I remember quiche being the go-to dinner during a busy week growing up.  I knew this week would be the same for me so I planned ahead!  I wanted to make an asparagus quiche but Whole Foods was surprisingly out of asparagus.  I know the season is over at the farmer’s market but I figured the store would have some. Maybe WF is more “seasonal” than I thought!  After listening to the produce guy profusely apologize for the lack of asparagus and promise me he would have some tomorrow, I found some mushrooms and leeks and went with those instead.

Quiche aux Poireaux et Champignons

Adapted from Julia Child’s “quiche aux oignons” from Mastering the Art of French Cooking-Volume One

 Ingredients:

1 pie crust (I used a whole wheat one but it tasted a little funny so I would recommend whatever you usually use)

2 medium sized leeks

1/2 tbs of flour

little knob of butter

2 tbs of olive oil

About 2 cups of roughly chopped crimini mushrooms

3 eggs (the recipe called for 2 eggs or 3 yolks so I just put in all three eggs. I’m guessing this made my quiche firmer than had I just used 2.  It worked…I liked it… so I’m going to go with it)

2/3 cup of heavy cream

1 tsp salt

black pepper to taste

1/2 cup of grated Swiss cheese (I used ementhal)

Directions:IMG_3978

Pre-bake your pie crust: Set oven to 400 degrees.  Take your pie shell and prick the bottom all over with a knife, cover it with aluminum foil and fill it with either little pastry peas or if you don’t have any like me, use dried beans.  I used lentils.  The beans/ pastry peas weigh down the shell to make sure it doesn’t bubble up while baking.  Bake the pie shell with the beans for 10 minutes at 400 degrees.  Take the pie shell out and reduce the oven to 375 degrees.

 Prep your vegetables: Wash and roughly chop your mushrooms.  Slice your leeks in half and run them under water to make sure all the sand and dirt trapped between the leaves are gone.  Slice the leeks into thin half moons.  The larger the half moons are the longer the leeks will take to cook down so use your judgment!IMG_3979

Put half of your butter in a sauté pan with some olive oil so the butter doesn't burn, and sauté them until they have released some of their liquid and are slightly brown.  Remove from the pan and set aside.

Put the rest of the butter and a little more olive oil into the pan and add the leeks.  They will take longer to cook.  Let them kind of sweat in the pan until they soften up considerably and you don’t think you’ll bite into a piece of raw “onion”.  They will cook a little more when you are baking the quiche but you want them to be mostly cooked now.  Add the cooked mushrooms and let them get to know each other.  Add a little salt and a pepper to taste.  Sprinkle the flour and mix it al together.  Take off the burner and let them cool off a little (you’ll be adding this to the egg/cream mixture and you don’t want to scramble the egg).

IMG_3983 In a bowl mix the 3 eggs and the cream together.  Add your leek and mushroom mixture to the eggs along with 2/3 of the grated cheese.  Mix well.IMG_3981Don’t you just love the color of these eggs? I finally broke down and bought eggs at the farmer’s market instead of a the store… They taste great and are just so pretty!   

Remove the beans and foil from your pre-baked pie crust (I’m assuming this is an obviously step but you never know) and then pour your mixture into the pie shell.  I kept my pie shell on a cookie sheet just to make it easier to take it in and out of the oven.  Cover the quiche with the extra cheese and pop it in the oven for 30 minutes at 375 degrees.  IMG_3986 When it is done the cheesy top should be lightly browned.IMG_3990 The quiche will look slightly puffy when you first take it out.  The eggs will deflate a little bit as it cools.  That’s fine, in fact that’s normal.

I eat quiche cold, warm, for breakfast, lunch and dinner.  It’s such a versatile receptacle for all sorts of delicious ingredients.  You can make a ham and cheese one, one with all sorts of green vegetables if you don’t think you are eating enough “vitamin green”, you could make it “Mediterranean” with olives, peppers, tomatoes and Feta, or go Scandinavian and use smoked salmon and dill.  There are so many combinations it’s pretty hard to get tired of quiches.  The cream and eggs give you protein even if you only put vegetables in it so you are covered in terms of nutrition.  Explore and enjoy!

IMG_4000 Thanks for the pretty peonies Alex!

IMG_4017

IMG_4018


Leek and mushroom quiche served with sautéed sugar snap peas and fleur de sel. Paired with the always necessary glass of Sauvignon Blanc.

POLL: How many people noticed that I first posted this with “leak” quiche in the title.  My proofreader-grandmother would NOT be impressed.